There aren’t too many software products that can boast still having its original development team (the two original programmers as well as the majority of Maxon's early hires are still part of the development team) after 25 years, or having started first on the Amiga platform, migrated to Windows, Alpha NT, and the Macintosh OS. But it all applies to Cinema 4D, Maxon’s venerable 3D application. If a bit of history is in order, it’s because in an ever-changing landscape of applications, especially in the 3D realm, it’s great to see an app that has remained consistent, and refined thoughtfully over the passage of time. The latest version is Cinema 4D R16.
Maxon released Cinema 4D R16 in September 2014 – a robust and mature 3D design and animation software that evolved since the first production worthy release in 1997 – known then as Cinema 4D XL V5. With the release of Cinema 4D R16, Maxon has improved Cinema 4D with new features requested by users such as 3D Motion Tracking “for easily integrating content within live footage” and more intuitive modeling tools like the new PolyPen tool – where points, edges and surfaces can be easily be moved, extruded and subdivided which are welcomed options for quickly modifying models which was lacking in earlier releases. A big change on the material side is that the Reflectance Channel (found within each material) can be applied on a layer by layer level for more complex and subtle material effects.
For a complete list of new features go here: http://www.maxon.net/products/general-information/general-information/all-new-r16-features.html
Cinema 4D R16 is a feature rich software tool for designers and there has probably never been a better or easier time to jump in and learn Cinema 4D. In addition to the many features there are resources right at your fingertips – things like full 3D scenes, lighting setups, and an assortment of materials are included in packages that are invaluable resources for those new to Cinema 4D, as well as experienced pros. For users who are new to 3D modeling and scene creation, lighting can be one of the most challenging components to master – with Cinema 4D you get an assortment of lighting presets which can be analyzed and dissected to better understand how experienced users go about creating proper lighting effects. The same scene and lighting presets that are provided can quickly become templates for your own designs, helping to get you up to speed quickly and on the road to mastering Cinema 4D.
Cinema 4D Prime has the tools that many users would want in one package – from modeling, materials, lighting, and rendering, to tools for basic character rigging and manipulation. For users who are looking for more advanced animation and motion graphics there are tools like Bodypaint (used for mapping and painting objects); and MoGraph – used for more advanced motion graphics.
It’s best to confirm that what’s in the package you want by checking the features comparison page at: http://www.maxon.net/products/general-information/general-information/product-comparison.html
Advanced users can also find support for 3rd party plug-ins such as non-biased render engines like V-Ray and Maxwell.
To get a better feel for some of the new tools in R16, I spent several weeks immersing myself in the software, in conjunction I subscribed to Maxon’s online Cineveristy; followed Maxon’s Twitter feed; and watched lots of free Cinema 4D YouTube videos. Cineversity, Maxon’s dedicated training and online education portal is by far the largest and most complete resource for Cinema users and has resources available for both beginners and pros – if you’ve ever struggled with trying to achieve an effect, wanted to show your work for feedback, or needed help – this is the place to find thousands of tutorials, visual effects techniques, a knowledgebase and forums. Other areas where you can find Cinema resources include YouTube, online creative communities and various independent producers of tutorials. The amount of free on line tutorials (YouTube) that can help you learn Cinema 4D is impressive and can be handy during those times you are looking for fundamentals, inspiration, or looking to experiment. Creative Cow, an online creative community, also has a large base of Cinema 4D users and free tutorials. There are also a number of websites where you can purchase tutorials for a fee that can walk you through different creation processes step by step. It’s good to know that if you are thinking about learning Cinema 4D there are many resources available.
As a designer I use many different software tools depending on what my clients need. I use Cinema 4D predominantly for rendering scenes – I might create the models in another software and import them into Cinema 4D, add materials, lighting and render – it’s an effective workflow for me. More typically, I model outside Cinema 4D primarily because I learned to model on different software when starting out as a designer. Prior to the latest release when drawing splines and straight lines in Cinema 4D it just didn't feel intuitive or easy – I found it much easier to draw in what I was comfortable with – Illustrator or Rhino and then import them.
That said, I decided to spend a couple hours in Cinema 4D R16 working with splines and extrusions to create a glass and liquid and once I got the hang of it, I felt that I would certainly consider using it to model future projects. One of the advantages of Cinema 4D is that it gives users options for creating objects -- some objects can be created with splines while others can be created using primitive objects. Adding to the modeling versatility is Cinema 4D’s parametric and non-destructive approach – a feature found in much more expensive CAD programs that allows for quick updating of models. For example if you needed to change the edge of a model from a fillet to a bevel, you simply change the command and the model updates. Once a final model form is settled on, it’s then possible to convert parametric objects into meshes for painting and texturing.
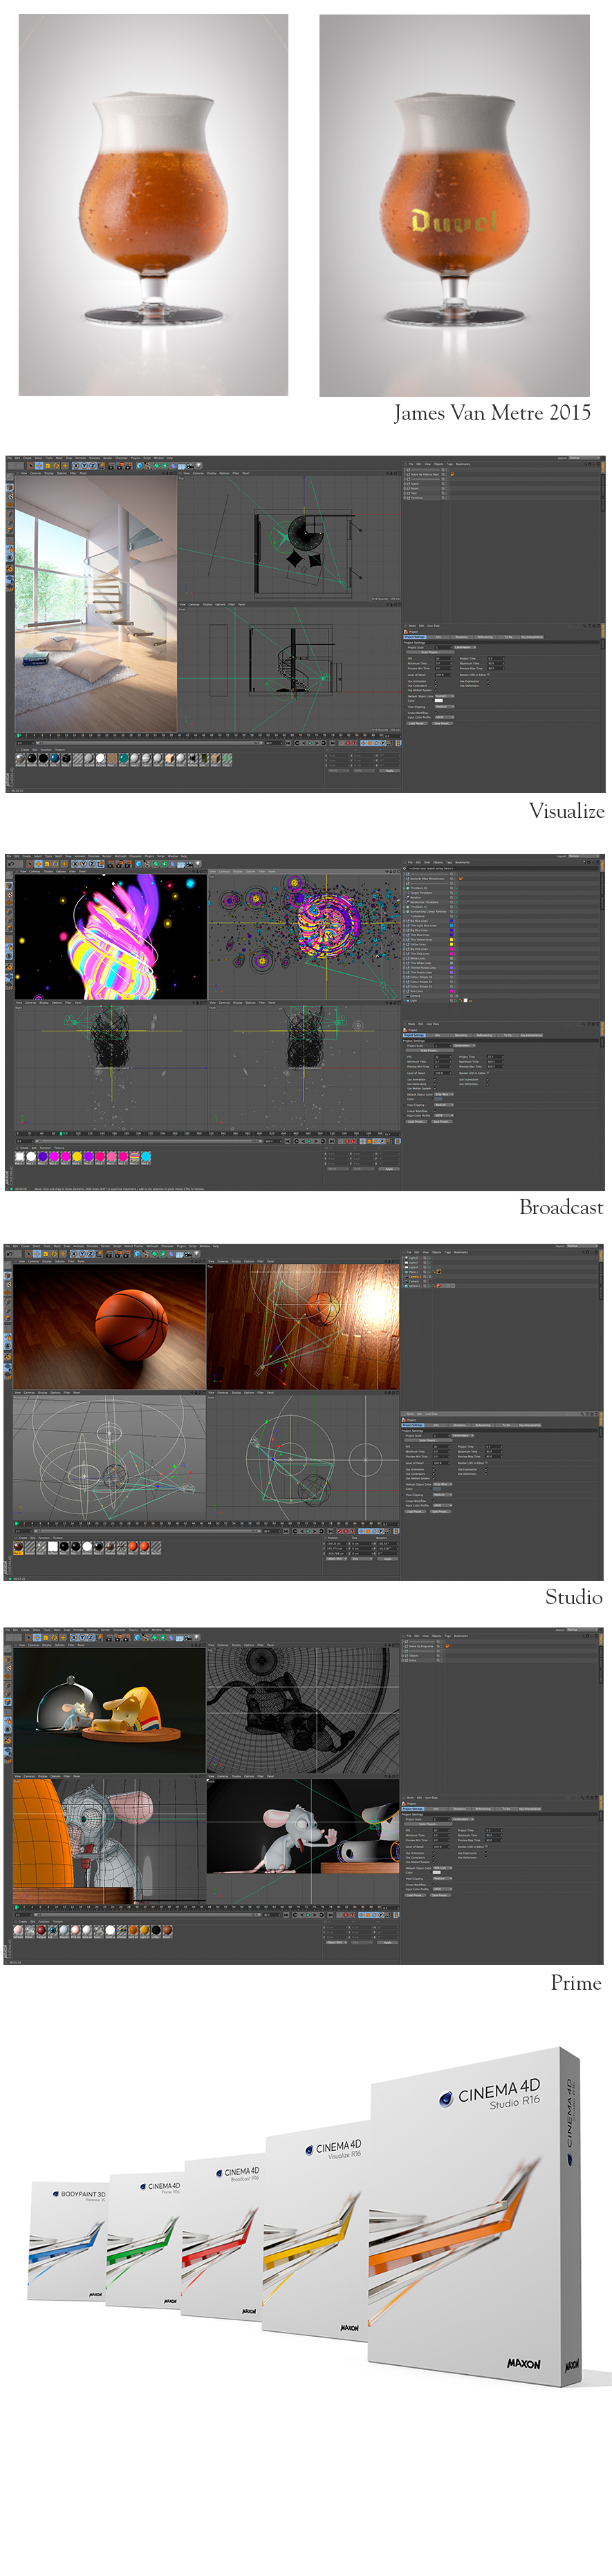
To get a quick start with Cinema 4D R16 I jumped into a glass and liquid tutorial to better understand the software and felt inspired to create my own rendering of a glass of beer with condensation and a logo. I modeled the bottle in Cinema 4D, created materials, added lights to the scene and pulled a logo off the web of one of my favorite beers and incorporated it into the model. To the right are the results!
Thinking that I completed my review of Cinema 4D R16, I sent my editor a copy for review, and heard back that one thing I completely missed (and it’s major) is talking about how quickly Cinema 4D R16 can render. To be frank, the quality and speed of the renders during my testing was very good and the process seamless – it’s just something I’ve come to expect (take for granted) with Cinema 4D. If you plan to animate, need many different images or need something created at a high resolution, render speed is important – especially in a production environment with clients setting deadlines. A little more subtle to those new to 3D, but also important, is that a fast render speed and the ability to quickly see a scene develop (or at least part of it) helps the designer iterate faster and see the changes and make adjustments much more quickly, increasing the pace of learning and making connections to cause and effect much more apparent to the user.
With that in mind a large part of the rendering process (for those new to 3D) is testing, testing, testing, which means tweaking of materials and lights until you can get a scene right where you want it. Knowing that testing of materials and lights is going to be part of your process, R16 has the capability to render scenes fast – to create the glass, liquid, condensation, and reflection to a resolution of 2480 x 3450 took about 20 minutes once I finished tweaking. For some perspective, if I were using an unbiased renderer like Maxwell (which I also use), I would expect a similar scene to take over an hour or more to render. This review isn’t about which renderer is the fastest, but it is a reminder that render speed is relative to the complexity of the scene and variables like polygon count, output resolution, lighting, hardware and software.
For anyone interested in testing hardware capabilities Maxon offers for free, Cinebench, “a real-world cross platform test suite that evaluates your computer's performance capabilities“... go to: http://www.maxon.net/products/cinebench/overview.html
Cinema 4D is an industry leading software and has been used in many feature movies and television shows. It’s one of “go to” software solutions for creating motion graphics (think of all the moving graphics you see on a screen during an NFL game) for TV and the web. Whether you are just starting out or an experienced 3D artist, Cinema 4D R16 has the tools to help take your work to the next level.
What’s the price? Cinema 4D comes in four different packages depending on what you need. There’s Prime ($995), Broadcast ($1695), Visualize ($2295) and Studio ($3695). If you have the resources for Studio, it’s the most feature and content rich, but if you are jumping into Cinema 4D for the first time Prime is a very good option and it’s upgradable. Built into the cost of any of packages are example scenes, lights, and materials that are extremely helpful in jumpstarting your experience and will quickly get you on the road to mastering the essentials of Cinema 4D.
There are also options for students to learn the app, and an extensive ecosystem to support users, no matter the level. The different levels allow you to start working with it at various levels, from skill to price, and the loyal user base insures that you are part of a growing and vibrant community. Cinema 4D R16 is a complete design and animation solution, and comes highly recommended!
James Van Metre, with additional reporting by Harris Fogel and Nancy Burlan, posted 6/12/2015
For more information on Cinema 4D R16 visit: www.maxon.net
About James Van Metre: James is a multi-disciplined industrial designer (Pratt Institute) and the creative force behind Emergent Studio a boutique design agency at the intersection of design and culture. A portfolio of Jim’s work can be found online at Coroflot.com and it’s also available on Krop.com