Recently, we had a major data crash, a 6TB RAID configured as a multi-disc mirror became corrupted, and since it was a mirror, it dutifully duplicated the corrupted data. To make matters worse, even after other tools were able to get the RAID up and running, we were missing tons of files. Great, just what I needed during a busy week. 6TBs of files, backed up, or corrupted, with one of the backup drives corrupted, and no easy access to the offsite access, this was an IT crash from hell.
To provide some background the RAID was a combination internal and external drive with an older MacPro tower, with 2 of the internal drive bays used for the RAID, and one of two other discs were rotating offsite drives that rotated out of an external E-Sata Firmtek 5 Bay enclosure. The RAID was created using SoftRAID 5.5.5, and suddenly after a computer restart, the RAID gave a warning error. We did another restart, thinking it was just a glitch, but instead now the RAID wouldn’t mount at all. We reached out to SoftRAID tech support, sent them the logs, and the issue weren’t with SoftRAID, but with a corrupted drive (the drive connected to the external SATA unit) that corrupted the rest of the mirror. So, their advice was to try to repair the volumes to get it mounted again. The drives themselves were Enterprise Level Seagate Drives, which have proven rock solid, and superb performers. We have run numerous diagnostics and certifications on these drives and have yet to find a single error. The moral is that serious enterprise level drives are worth the extra expense, especially when used in a NAS or RAID. It was comforting to know that despite the corruption, the drives themselves weren’t at fault.
To repair the disk initially, at their suggestion I used Disk Warrior 5, one of our favorite and most respected tools, and it was able to correct much of the damage, so that the RAID drives would mount, albeit with a lot of missing data, and corruption, but still it was impressive to even have the mirror operational. It took Disk Warrior over a day to work on the disc, but at least in the end it mounted, with lots of folders of either corrupted data, misplaced data, or folders that were empty. It’s a sinking feeling to discover empty folders of what were once digital image files.
Slowly, slowly, through comparisons of data, using Lightroom CC to check imported files for errors, I began to figure out which data was missing, corrupted, or what data appeared to be sound, but were in reality corrupted. I also discovered that even with a robust backup strategy, that there were still plenty of problems. So, I started to recreate the dataset, and later with the help of an offsite drive that hadn’t been corrupted but was out-of-date, I was able to slowly rebuild the dataset. Unfortunately, there were a slew of important images, DNG files that were still missing.
I knew the information for those missing image files, such as file type, size, names, and dates, but nothing I tried could find them, and while some recovery apps did manage to find some files, most of the time they wouldn’t open. So, I was pretty much resigned to losing the missing images forever. Well that was until we tried the newly released Disk Drill 3.
As reviewers we receive a lot of invitations to consider new products for review. But it piqued our curiosity when an invitation to test an app we had never heard of had arrived in our inbox. The invitation from CleverFiles was to test Disk Drill Pro 3 for Mac OS. We had already downloaded the app and installed it, but hadn’t had time to try it yet. So, after exhausting all our other options without much success, this seemed like the perfect time. As a side note, when I asked for a bit of background on the company, this is their description, "CleverFiles, the Atlanta-based tech company operating as a brand of 508 Software, LLC, is a social enterprise with proven knowledge of data management and operations, and versatile connections in the non-profit world. Empowering thousands of users with unified data recovery and protection technologies, CleverFiles also sponsors various non-IT charity events in the area." So, consider yourself informed.
The app has an easy to use GUI, when you launch it you are greeted by the image of a smiling man, with glowing goggles, in a lab coat. Surrounding it is a statement that says, “The New Disk Drill – Recover, protect, visualize your data & clean up your Mac”
As a full-featured app it can also create bootable drives, recover data from iOS and Android file systems, look for duplicates, and clean up your Mac. It also has SMART monitoring and after you activate that feature, there are little icons in the menu bar for each drive, showing its status. So, it’s far more than just your usual recovery app.
The basic version is free, but we recommend upgrading to Disk Drill PRO or Enterprise, which unlocks an impressive feature set, including the ability to export a forensic report, and will also generate a backup clone.
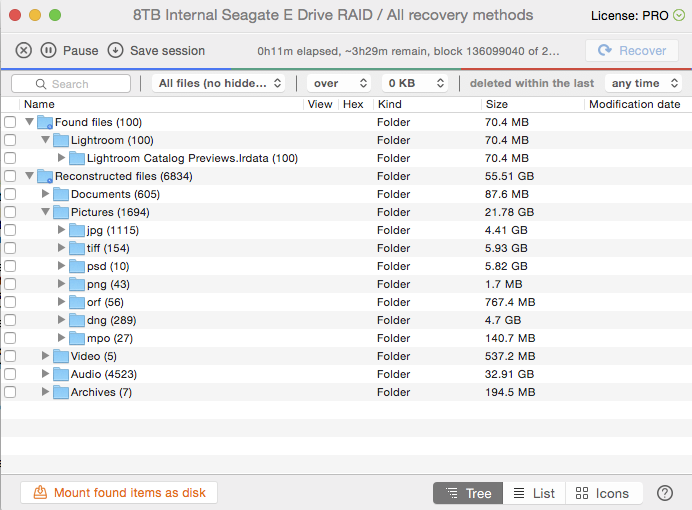
There is an easy to use “Single Power Button” that starts a recovery from the disk you choose. The next step is to preview your data in Disk Drill Basic. In our case, it built a list of files, which we narrowed to image files. One of the surprises was how fast it worked. Instead of a day or more to work, it generated a list of files almost immediately, and for the full 6 TBs of data, the fill preview list took around 3 hours, which allowed us to go into the “Found files” folder, which as you open the triangle folder options start to reveal the files. We opened the "Pictures" folder, which revealed options for each file format found, in our case: JPG, TIFF, PSD, PNG, DNG, ORF, CRW, NRF, and more. Since we knew that our missing files were DNG, we selected that folder, and next to each found file, you can click on a little eyeball icon for a quick preview.
This was essential, since it let us know if we were even on the right track, and it was wonderful news to see that our missing images not only were there, but also appeared to be recoverable. We then decided to let the system finish the previews. We sped it up considerably by deselecting the files formats we weren’t interested in recovering. Then, we selected the folder that held all the DNGs, and let Disk Drill to start recovering.
Not only did Disk Drill 3 find our missing files, it recovered all the missing files, which as native DNGs created by a Ricoh GR aren’t a well-known format for many apps. Of course none of this would matter unless the files opened properly, and amazingly, they all did. Recovering those files was a feat that is nothing to blow off. With some file renaming using Adobe DNG Converter, all was well, and the newly recovered files imported and opened in Lightroom Creative Cloud without a hitch. And those dates I mentioned earlier, the DNGs maintained the proper creation dates, and after all was said and done more then 1,500 images were recovered, all of which are usable.
This was truly a small miracle, and the speed and ease in which Disk Drill 3 recovered those files was pretty amazing, especially since it was both effortless, logical, accurate, and succeeded where other apps failed. With most serious recovery software, you typically need to enact more and more advanced recovery methods. What was impressive about Disk Drill 3 was that it recovered our files using the initial recovery routine. If you haven’t heard of Disk Drill 3, it’s time you checked it out. It was a lifesaver for us. We highly recommend Disk Drill 3, and for a full list of features, visit their site. They also have a Windows version. Happy File Recovery!
Harris Fogel and Ken Kramar, posted 11/20/2016
For more information on CleverFiles' Disk Drill Pro 3 for Mac OS visit: http://www.cleverfiles.com